Wednesday, September 3, 2014

Slipstream Commandline for Adobe Patches

Copy the main adobe msi and all adobe patches into the desktop

Run the below command line in CMD

Msiexec /a adobe.msi /p adobe1.msp;adobe2.msp;adobe3.msp

Press Enter

It will prompt the welcome screen, Click Next

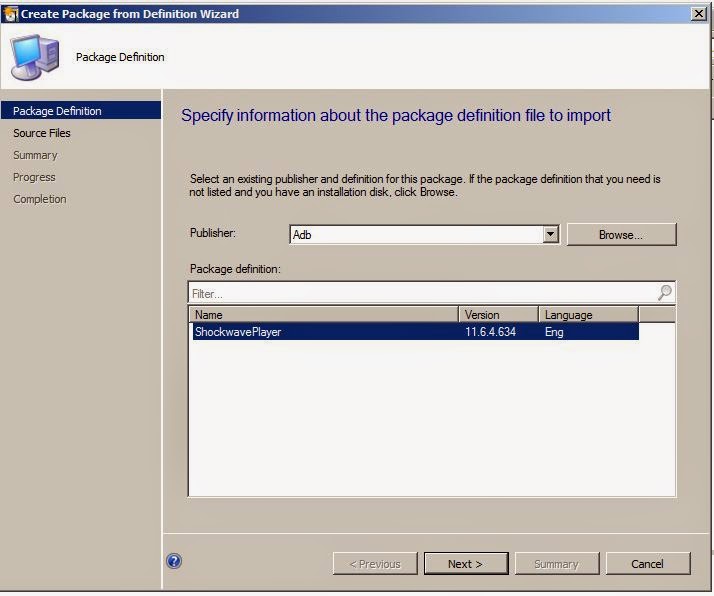
It will ask for the network location. Give the local computer location as like below


Click install.

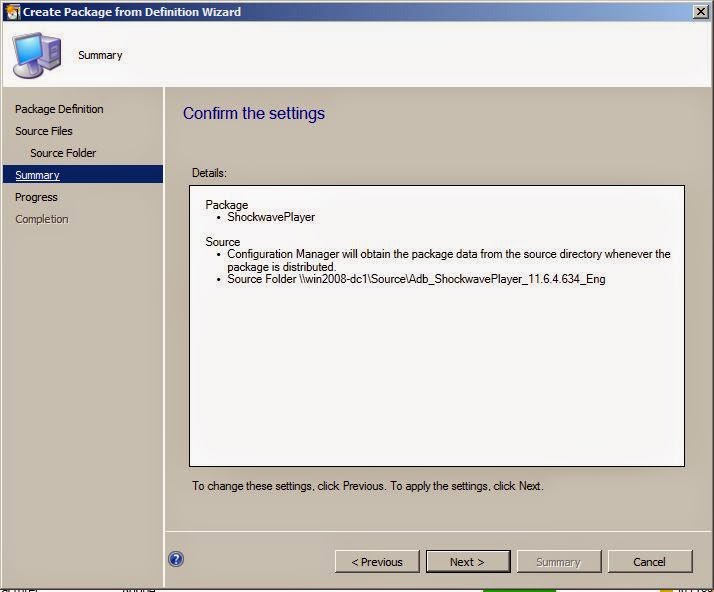
Once the installation is finished. We will get  the files in the given location.(C:\Newfolder)

Copy all the files from newfolder and place in the packaging location.

From the packaging location run adobe msi. It will install with patches.
 

How to disable or install a feature in MSI

In Feature Table, Goto Level of the particular feature which as to be disabled and  set it to 0

Another way to disable feature is set the feature level to above the value of INSTALLEVEL property value.

If INSTALLLEVEL property value is 100, then feature level has to be any value above 100.


By using properties:

ADDLCOAL=ALL (For installing all the features)

In MSI feature table. we can see the feature name. If we want to install the particular feature. Get feature name from msi feature table and add in the ADDLOCAL property

For Example:
ADDLOCAL=Test,Sample
 

Deleting entries in ora file using VBscript

Create one temp.ora file in the location of Vbscript and add the entries manually in temp.ora file.

When executing vb script it will compare the temp.ora file with test.ora in this  location(\oracle\product\11.0.0.0.0\network\admin\) and it will delete accordingly.


On Error Resume Next
Const ForReading = 1
Const ForWriting = 2

Set Wshshell = CreateObject("Wscript.Shell")
Set objFSO   = CreateObject("Scripting.FileSystemObject")

StrCurrPath = Replace(Wscript.ScriptFullName,Wscript.ScriptName,"")
ORAFilePath   = Wshshell.ExpandEnvironmentStrings("%systemdrive%") & "\oracle\product\11.2.0.2.0\network\admin\"
ORAFilePath     = ORAFilePath & "test.ora"
TmpORAFilePath = StrCurrPath & "temp.ora"


Set objORAfile = objFSO.OpenTextFile(ORAFilePath, ForReading)
 StrReadORAFile= objORAfile.ReadAll
objORAFile.Close

Set objTmpORAfile = objFSO.OpenTextFile(TmpORAFilePath, ForReading)
 StrReadTmpORAFile= objTmpORAfile.ReadAll
objTmpORAfile.Close


If Instr(StrReadORAFile,StrReadTmpORAFile) <> 0 then
StrData = Replace(StrReadORAFile,StrReadTmpORAFile,"")
Set objORAfile = objFSO.OpenTextFile(ORAFilePath, ForWriting)
objORAfile.Write StrData
objORAfile.close

End If

Appending entries in ora file using VBscript

Create one temp.ora file in the location of Vbscript and add the entries manually in temp.ora file.

When executing vb script it will compare the temp.ora file with test.ora in this  location(\oracle\product\11.0.0.0.0\network\admin\) and it will append accordingly.

On Error Resume Next
Const ForReading = 1
Const ForWriting = 2
const ForAppending = 8

Set Wshshell = CreateObject("Wscript.Shell")
Set objFSO   = CreateObject("Scripting.FileSystemObject")

StrCurrPath = Replace(Wscript.ScriptFullName,Wscript.ScriptName,"")
ORAFilePath   = Wshshell.ExpandEnvironmentStrings("%systemdrive%") & "\oracle\product\11.0.0.0.0\network\admin\"
ORAFilePath     = ORAFilePath & "Test.ora"
TmpORAFilePath = StrCurrPath & "Temp.ora"

Set objORAfile = objFSO.OpenTextFile(ORAFilePath, ForReading)
 StrReadORAFile= objORAfile.ReadAll
objORAFile.Close


Set objTmpORAfile = objFSO.OpenTextFile(TmpORAFilePath, ForReading)
 StrReadTmpORAFile= objTmpORAfile.ReadAll
objTmpORAfile.Close

If Instr(StrReadORAFile,StrReadTmpORAFile) = 0 then
Set objORAfile = objFSO.OpenTextFile(ORAFilePath, ForAppending)
 objORAfile.Writeline StrReadTmpORAFile
objORAFile.Close

End if

Monday, August 11, 2014

Deleting Folders & Subfolders using VBscript


Set folder = fso.GetFolder("C:\Program Files\Test")
' delete all files in root folder
for each f in folder.Files
   On Error Resume Next
   name = f.name
   f.Delete True
   
   On Error GoTo 0
Next

' delete all subfolders and files
For Each f In folder.SubFolders
   On Error Resume Next
   name = f.name
   f.Delete True
   
   On Error GoTo 0
Next

Deleting Appdata file for all the users

Dim FSfolder 
Dim subfolder 
Dim i 


set objshell = CreateObject("Wscript.shell") 
Set FSO = CreateObject("Scripting.FileSystemObject")
Profile = strSysDrive & "C:\Users"
Set FSfolder = FSO.GetFolder(Profile) 'getting the user profile folders


'starting of the loop to delete the HKCUs


For Each subfolder In FSfolder.SubFolders


   If (subfolder.Name <> "All Users" And  subfolder.Name <> "Default User"_
   and subfolder.Name <> "Public" and subfolder.Name <> "Default") Then


 folder1=Profile & "\" & subfolder.Name & "\AppData\Roaming\Quest Software\Test"

DeleteThisFolder(folder1)

  end if


Next 


Function DeleteThisFolder(FolderName)


    If FSO.FolderExists(FolderName) Then
       On Error Resume Next
       fso.DeleteFile(Profile & "\" & subfolder.Name & "\AppData\Roaming\Quest Software\Test\sample.lnk")
    End If

End Function

Sunday, July 27, 2014

How to extract images from .mht file


Open .mht file in Microsoft word

Open Microsoft word -->click windows icon -->click open-->select .mht file


.mht file opened in microsoft word


Save word document (Save as type --web page)


In saved location. folder will be available 


open the folder -->We can see images

How to extract images from word document


Mandatory - Winzip should be installed in the system

Rename docx file to rar file


Open rar file using winzip

Open word folder


Open media folder


We can see the images


Copy the images


paste the images


Wednesday, July 16, 2014

Removing Registry-BinaryValue using VB Scripts

Const HKEY_CLASSES_ROOT  = &H80000000
Const HKEY_CURRENT_USER  = &H80000001
Const HKEY_LOCAL_MACHINE  = &H80000002
Const HKEY_USERS   = &H80000003
Const HKEY_CURRENT_CONFIG  = &H80000005


strComputer = "."

Set oReg=GetObject("winmgmts:{impersonationLevel=impersonate}!\\" & _ 
    strComputer & "\root\default:StdRegProv")

strKeyPath = "SOFTWARE\V6R2012x"

strBinaryValueName = "AUTOCAD"


oReg.DeleteValue HKEY_LOCAL_MACHINE,strKeyPath,strBinaryValueName

Removing Registry-MultiStringValue using VB Scripts

Const HKEY_CLASSES_ROOT  = &H80000000
Const HKEY_CURRENT_USER  = &H80000001
Const HKEY_LOCAL_MACHINE  = &H80000002
Const HKEY_USERS   = &H80000003
Const HKEY_CURRENT_CONFIG  = &H80000005

strComputer = "."

Set oReg=GetObject("winmgmts:{impersonationLevel=impersonate}!\\" & _
    strComputer & "\root\default:StdRegProv")

strKeyPath = "SOFTWARE\V6R2012x"

strMultiStringValueName = "AUTOCAD"


oReg.DeleteValue HKEY_LOCAL_MACHINE,strKeyPath,strMultiStringValueName

Removing Registry-ExpandedStringValue using VB Scripts

Const HKEY_CLASSES_ROOT  = &H80000000
Const HKEY_CURRENT_USER  = &H80000001
Const HKEY_LOCAL_MACHINE  = &H80000002
Const HKEY_USERS   = &H80000003
Const HKEY_CURRENT_CONFIG  = &H80000005

strComputer = "."

Set oReg=GetObject("winmgmts:{impersonationLevel=impersonate}!\\" & _ 
    strComputer & "\root\default:StdRegProv")

strKeyPath = "SOFTWARE\V6R2012x"

strExpandedStringValueName = "AUTOCAD"

oReg.DeleteValue HKEY_LOCAL_MACHINE,strKeyPath,strExpandedStringValueName

Removing Registry-String Value using VB Scripts

Const HKEY_CLASSES_ROOT  = &H80000000
Const HKEY_CURRENT_USER  = &H80000001
Const HKEY_LOCAL_MACHINE  = &H80000002
Const HKEY_USERS   = &H80000003
Const HKEY_CURRENT_CONFIG  = &H80000005

strComputer = "."

Set oReg=GetObject("winmgmts:{impersonationLevel=impersonate}!\\" & _ 
    strComputer & "\root\default:StdRegProv")

strKeyPath = "SOFTWARE\V6R2012x"

strStringValueName = "AUTOCAD"

oReg.DeleteValue HKEY_LOCAL_MACHINE,strKeyPath,strStringValueName

Removing Registry key Using VB Scripts

Const HKEY_CLASSES_ROOT  = &H80000000
Const HKEY_CURRENT_USER  = &H80000001
Const HKEY_LOCAL_MACHINE  = &H80000002
Const HKEY_USERS   = &H80000003
Const HKEY_CURRENT_CONFIG  = &H80000005

strComputer = "."

Set oReg=GetObject("winmgmts:{impersonationLevel=impersonate}!\\" & _
    strComputer & "\root\default:StdRegProv")

strKeyPath = "SOFTWARE\V6R2012x"
strKeyPath1="SOFTWARE\Microsoft\Windows\CurrentVersion\Installer\UserData\S-1-5-18\Components\EE9929DE5563356CDE4A7CA7331EF14A"


oReg.DeleteKey HKEY_LOCAL_MACHINE, strKeyPath
oReg.DeleteKey HKEY_LOCAL_MACHINE, strKeyPath1

Thursday, June 26, 2014

Software Distribution in SCCM 2012 (Using Create package from Definition Option)


Go to Software Library-->Click packages-->Click Create package from Definition


Click Browse


Point the SMS file and Click Open


Click Next


Select Always obtain source files from a source folder


Copy network share location of package 


Click Next


Click Close


Click on Application and on top of console .we have distribute content options . Click on distribute content


Click Next


Click Add and select distribution point


Click Next


Click Close


Go to Monitoring tab--> Distribution status-->Content status and click on the application . You can see package is copied to distribution point (success-1) 


Right click on application and Click Deploy


Click browse on software


Select program. I am selecting Install program


Click browse on Collection


Here i am selecting user based collections.

Select WIN 7 Users


Click Next


Here also we can add distribution points


Select Required options and Click Next


Selecting Mandatory assignments 


Click Next


Click Next


Selecting Download content from distribution point and run locally


Click Close


On client machine “Run the machine policy retrieval & evaluation cycle policy”


In software center We can see application installing


In software center Now we can see application installed


In Add or remove programs. We can confirm application is installed


Software Distribution in SCCM 2012 (Using Create package Option)

Go to Software Library-->Click packages--> Click Create package


Add information about package and point the source folder location of application


We have different program types . I am selecting Standard program


Add information about program. In command line I have provided install.cmd. Directly we can give the command line there
Run mode-->We can run the application with user or administrative rights. I am selecting administrative rights.
Click Next


In Run we have different options. Normal – we can see the installation of msi and hidden will be silent installation 


Here we can add dependencies and platform requirements

Click Next


Click Next  


Click Close
  

Click on Application and on top of console .we have distribute content options . Click on distribute content


Click Next


Click Add and select distribution point


Click Next


Click Close


Go to Monitoring tab-->Distribution status--> Content status and click on the application . You can see package is copied to distribution point (success-1) 
Right click on application and Click Deploy


Selecting Win7 Machine collection


Here also we can add distribution points


In Purpose we have two options Available and Required.
Available options -->It will be available in software center. We have to manually install the application from software center .
Required options-->It will be available in software center and it will run automatically when it reach the mandatory time.

I am selecting available options


Schedule the application available and Click Next


Click Next


Selecting Download content from distribution point and run locally


Click Next


Click Next


Click Close


On client machine “Run the machine policy retrieval & evaluation cycle policy”


In software center, Application status is available


Click Install


Downloading from distribution point to client cache folder


Once downloaded completed . Application will start installing


In software center Now we can see application installed


In Add or remove programs. We can confirm application is installed